Why You'll Love It
- - No oven needed, perfect for hot days
- - Creamy, nutty filling that sets beautifully
- - Crunchy graham crust adds texture
- - Quick to assemble, ideal for last‑minute gatherings
*"I made this for a potluck and everyone asked for the recipe – it's a crowd‑pleaser!"*
Essential Ingredient Guide
- Graham cracker crumbs: Choose unsweetened crumbs for a balanced base; toast lightly for extra crunch
- Peanut butter: Use natural, creamy peanut butter for authentic flavor without added sugars
- Cream cheese: Softened to room temperature; it gives the filling its silkiness
- Powdered sugar: Sifted to avoid lumps; sweetens without grainy texture
- Lemon juice: A splash brightens the richness and stabilizes the filling
- Whipped topping: Folded in at the end to keep the pie airy and light
Complete Cooking Process
-
Ingredient Readiness:
Measure crumbs, melt butter, and soften cream cheese before you begin; it keeps the process smooth.
-
Flavor Development:
Mix peanut butter with sugar and lemon juice; the lemon lifts the nutty depth.
-
Texture Control:
Press the crumb mixture firmly into the pan, then fold the whipped topping gently to retain air.
-
Finishing Touches:
Chill the pie for at least two hours, then drizzle extra peanut butter or sprinkle crushed peanuts.
-
Serving Timing:
Serve straight from the fridge; the filling holds its shape and the crust stays crisp.
- Use a springform pan for easy release
- Add a pinch of sea salt to the filling for extra depth
- Replace half the peanut butter with almond butter for a subtle twist
- Top with shaved chocolate for an elegant finish
Pro Tips
Well, those little details can turn a simple pie into a standout dessert. I like to let the pie rest longer on a warm day; the cooler air helps the crust stay firm. Also, if you’re serving to guests, a quick garnish of fresh mint adds a pop of color without overpowering the flavor.
The essence of the dish:
A fun fact or historical angle:
Flavor or sensory focus:
You Must Know
- Keep the filling chilled until serving
- Press the crust firmly to avoid cracks
- Use fresh lemon juice for brightness
Frequently Asked Questions
→ Can I use crunchy peanut butter?
Yes, but blend it a bit longer to achieve a smooth texture; the crunch will still be pleasant.
→ How long can I store the pie?
It stays fresh in the refrigerator for up to four days, covered tightly with plastic wrap.
→ What can I substitute for graham crackers?
Digestive biscuits or vanilla wafers work well; just adjust the butter ratio slightly.
→ Is this pie gluten‑free?
Use gluten‑free graham‑type crackers; the rest of the ingredients are naturally gluten‑free.
→ Can I add chocolate?
Absolutely – melt a handful of chocolate and swirl it into the filling before chilling.
→ What’s a good topping?
Whipped topping, toasted peanuts, or a drizzle of honey add extra layers of flavor.
Chef's Tips
If you prefer a sweeter crust, increase the sugar by one tablespoon.,A pinch of sea salt really lifts the peanut flavor.,For a thinner crust, reduce the butter to 3 tablespoons.
Nutrition Facts
per serving
420
Calories
12g
Protein
32g
Carbs
28g
Fat
Taste Profile
Creamy, nutty with a bright citrus hint
Ingredient Substitutions
Don't have an ingredient? Try these alternatives
Flavor shifts to almond; keep the same amount.
Crush finely; may need a tad more butter.
Recipe Variations
Try these delicious twists on the original
Spicy Version
Add a pinch of cayenne pepper to the filling for subtle heat.
Mediterranean Style
Stir in chopped pistachios and a drizzle of honey for a different flavor profile.
Common Mistakes to Avoid
Learn from others' mistakes for perfect results
- Over‑mixing the filling can make it dense.
- Skipping the chill leads to a runny texture.
- Using too little butter in the crust causes crumbling.
Meal Prep & Storage
Make Ahead Tips
You can prepare the crust and filling up to 24 hours in advance; keep them separate and assemble just before chilling.
Leftover Ideas
Refrigerate any leftovers; enjoy within three days for best texture.
Perfect Pairings
Serve this with...
Cooking Timeline
Prepare crust: combine crumbs, butter, and sugar; press into pan.
Blend filling ingredients until smooth; fold in whipped topping.
Spread filling over crust and smooth top.
Chill pie in refrigerator until set.
Garnish and slice for serving.
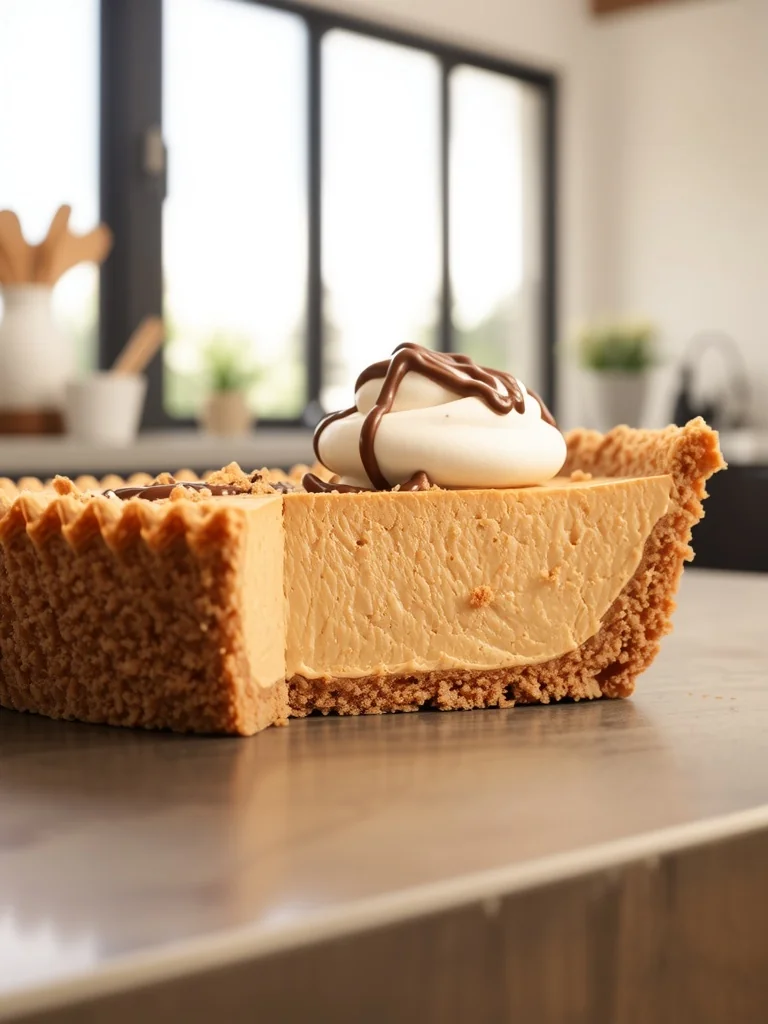
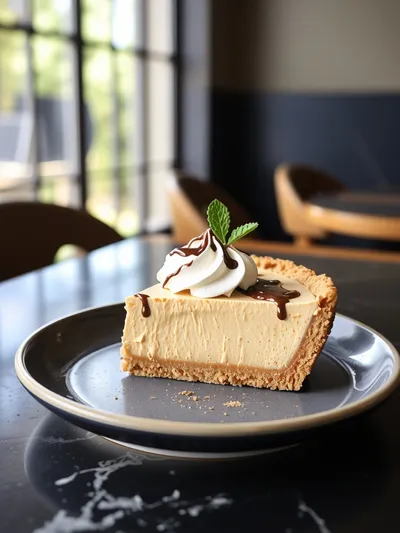
No Bake Peanut Butter Pie with Graham Cracker Crust
Enjoy a velvety no bake peanut butter pie on a crunchy graham cracker crust – quick, no‑oven dessert perfect for any sweet craving.
Timing
Prep Time
10 Minutes
Cook Time
0 Minutes
Total Time
15 Minutes
Recipe Details
Ingredients
Crust
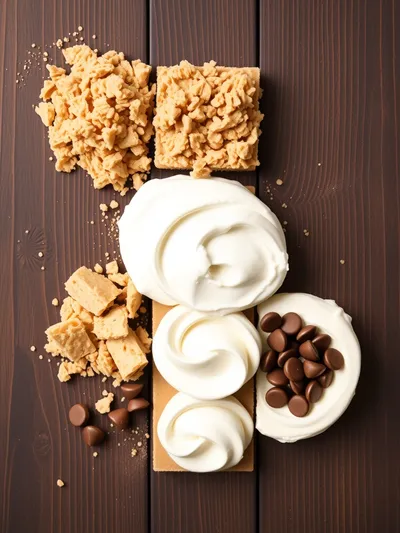
- 01 1 ½ cups graham cracker crumbs
- 02 ¼ cup melted butter
- 03 2 tbsp sugar
Filling
- 01 1 cup creamy natural peanut butter
- 02 8 oz cream cheese, softened
- 03 ½ cup powdered sugar
- 04 2 tbsp fresh lemon juice
- 05 ½ cup whipped topping
- 06 Pinch of sea salt
Garnish
- 01 Chopped peanuts
- 02 Drizzle of melted chocolate
Instructions
Combine graham cracker crumbs, melted butter, and sugar in a bowl; press the mixture firmly into a 9‑inch springform pan, creating an even base.
In a large mixing bowl, beat cream cheese until smooth, then add peanut butter, powdered sugar, lemon juice, and sea salt; mix until creamy and glossy.
Fold in the whipped topping gently, preserving the airy texture, then spread the filling over the prepared crust, smoothing the top with a spatula.
Refrigerate the pie for at least two hours, or until firm. Before serving, garnish with chopped peanuts and a drizzle of melted chocolate.
Slice with a warm knife for clean cuts and enjoy the cool, nutty sweetness.
Notes & Tips
- 1 If you prefer a sweeter crust, increase the sugar by one tablespoon.
- 2 A pinch of sea salt really lifts the peanut flavor.
- 3 For a thinner crust, reduce the butter to 3 tablespoons.
Tools You'll Need
-
9‑inch springform pan
-
Mixing bowls
-
Hand mixer or spatula
-
Measuring cups and spoons
-
Refrigerator
Must-Know Tips
- Don't skip chilling; it sets the filling perfectly.
- Let the crust cool completely before adding filling.
- Taste the filling before chilling; adjust sweetness if needed.
Professional Secrets
- Room temperature cream cheese ensures a smooth blend.
- Folding whipped topping gently keeps the pie airy.
- Pressing the crust firmly prevents cracks.

Recipe by
kendraKendra is the culinary heart behind Your Website, where she blends classic American comfort food with fresh, seasonal twists that keep readers coming ...
Get Delicious Recipes Weekly
Join 25,000+ home cooks getting our best recipes straight to their inbox.
Free forever • No spam • Unsubscribe anytime